I have been since my teenage years involved in gaming but I'd say I've gotten more serious into the wargaming hobby in the past 20 years. My interests are mainly in the age of gunpowder so I concentrate on military history from the 18th century on.
Right now my main passion is the great war or as we know it today as World War I. I got my interest in this era from being a World War I reenactor. As a member of the Great War Association twice a year I don the uniform of a Canadian soldier and run around in a mock Western front landscape located in southern Pennsylvania. The small-scale tactics that we use gave me the idea of trying to create a wargame of the Western front. I didn't want to game a scale of game greater than company level. Most wargames at the time were regimental or divisional in size. There was nothing at the squad level scale. So I decided to create my own game. The scale I picked was one figure equals one man, one tank equals one tank, and one artillery piece equals one artillery piece. The terrain had to reflect small-scale action. It also had to be dynamic in construction so that I can reconfigure the set up to change the composition of the landscape. So here's how I made it.
1/ I used 1" thick styrofoam board cut into 1 ft. tiles.

2/ Next I drew on them where I wanted the trenches. I made sure that the trenches exited each tile at the same place on each side. Why? So I can move the tiles around and still maintain continuity. This means I can change the terrain to get a different look.
3/ Used a 3/4" square router bit on a drill press set at it's highest speed. It was just fast enough to allow the router bit to carve out the trenches. I also used the same bit to put in the shell hole depressions in no man's land.
4/ Painted the whole lot using a medium brown latex paint. This seals it so afterwords I can use any type of paint.
5/ For sand bags I went to a craft store and bought a package of self hardening clay. I rolled it out on a cutting board to the desired thickness and length and then with a dull edged tool I pinched the sand bag shape. I then placed the strips of sand bags onto the desired location on the tile and let dry over night. The next day I took the hard sandbag strips and glued them down with a hot glue gun.
6/ For trench walls I bought some textured plastic sheets from the hobby store. I painted them and cut them to the desired height and length and again hot glue gunned them in place.
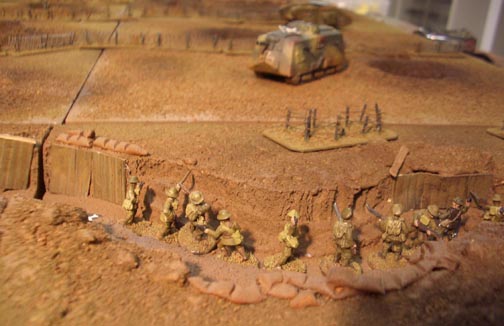
7/ The shell holes walls were built up using latex wood filler (I actually did this before step 4).
8/ For the dirt look of the terrain I used model train powdered earth or burnt grass. It's a very fine coloured powder. I mixed in some dried tea. Yes I said dried tea! Instead of throwing out your tea bags put them somewhere to dry out. When dry simply open up the bags and dump into a storage container. I mixed in some of this tea terrain with the powdered stuff. I found the powdered stuff a bit too fine and the tea (being a rougher and a lighter colour) balanced it off to the effect I wanted to achieve.
9/ Now use an spray bomb glue found in any building center or craft store. Spray the tile surface. Then sprinkle on the terrain powder. Shake of excess. Reapply glue and powder if all areas are not covered. You can also sprinkle the terrain powder on wet paint. I found this works better but remember the paint tends to dry fast so take that into consideration.
 That's how I created my terrain. It took about a couple of months to figure out but once I completed a few tiles the rest came quite quickly.